Printing from macOS to shared Windows Server queues with LPD and SMB
THE PAGE APPLIES TO:
“Help! SMB? LPD? I just want to connect my macOS devices to shared Windows Server print queues. Can you tell me when to use LPD or SMB connections, and how to configure them?”
Intro
Hey, there and thanks for getting in touch! Yes, PaperCut includes a host of features you can use to share print queues from your Windows print server to macOS users. However, in this article, we’ll tell you all you need to know about two straightforward sharing protocols, SMB and LPD, that Windows supports. Let’s jump right in.
KB Economy of Language Stats®
Reading time: 7 min 37 sec
Configuration time: 14 min 39 sec
Basic LPD and SMB specs
| Traits | Same | Different | What’s the deal? |
|---|---|---|---|
| Support using the printer’s model-specific driver | X | ||
| Support username authentication | X | ||
| Work well to create MDM config profiles | X | ||
| Support connections whether or not macOS workstations are members of the domain | X | ||
| Submitting a print job does not require entering a username or password | X | LPD sends a print job using the macOS computer’s current log-on name without a prompt. SMB requires authenticating with a username and password known to the Windows Print server either as local or domain accounts. | |
| TCP Ports | X | LPD uses port 515. SMB uses port 445. | |
| Out-of-the-box Windows server support | X | Windows Servers need a little TLC to support LPD print shares. Windows Servers support SMB print shares by default. | |
| Print queuing speed | um | uh | Protocol choice alone does not tell the whole story in relation to print speed. Other attributes affecting print speed are things like the driver, whether the target queue is physical or virtual, whether the document is color or simplex, the document file type, and what program someone used to print the job. |
Okay, that’s cool, but which one should I use?
Well, dear PaperCut admin, like many things in life, it depends.
Use LPD
Use LPD when users sign into their macOS workstations with usernames known to PaperCut. In other words, if Alice Doe signs into her MacBook with the adoe username and sends a print job over LPD, PaperCut attributes that job to Alice’s PaperCut username, adoe. Use LPD if there aren’t any obstacles to using it, the main requirement being to install PaperCut’s LPD service.
Use SMB
Well, we’ll keep this simple: use SMB when you can’t use LPD. Maybe one of the limitations of using LPD at your organization is that you can’t or won’t set up the Windows print server with the PaperCut LPD service, which is totally cool. You do you. Maybe another limiting factor to using LPD connections is that people sign in to their macOS workstations with usernames unknown to PaperCut. For example, let’s say Bob Smith’s MacBook username is bsmith. On the other hand, thanks to its Active Directory user/group sync config, PaperCut thinks Bob’s username is bobsmith. Bob can’t send print jobs using LPD because PaperCut doesn’t know a thing about bsmith. In this case, you can set up a print queue with an SMB connection that will prompt Bob for a username and password the first time he sends a print job to it. The username and password Bob uses in this prompt are the domain credentials, bobsmith, known toPaperCut’s username list thanks to the server’s integration with your Active Directory domain.
Um, can you TL;DR that for me, please?
Yep.
- When users sign into their macOS workstations with usernames known to PaperCut
- When you have no obstacles preventing the installation of the PaperCut LPD service on the Windows Print server
- When you can’t set up the Windows print server with the PaperCut LPD service
-OR-
- When users sign in to their macOS workstations with usernames unknown to PaperCut
-AND-
- When the PaperCut server gets its username list from the integration with your Active Directory domain
Siiick 🤙. So, how do I set up these connections?
LPD
On the Windows Server
1. First, install the PaperCut LPD service. I know, I know, you’re probably asking why can’t you use the one that ships with Windows. Well, it’s toast.
a. Browse to your print server’s PaperCut NG or PaperCut MF folder then \providers\lpd\win\.
b. Launch the pc-lpd-installer.exe executable.
2. Make sure to enable print queue sharing. Also, ensure the share name only uses alphanumeric (letters and numbers) characters. No spaces.

Setting up the queue on the macOS workstation
Note: Use any one of these options on a reference machine for MDM configuration profiles.
Using the System Prefs pane
1. Go to System Preferences > Printers and Scanners > + (plus sign)
2. Here, go to the IP tab and choose “Line Printer Daemon - LPD.”
3. Populate the Address field with the Windows print server’s IP address or FQDN.
4. Populate the Queue field with the queue’s share name.
5. Add the share name to the Name field as well.
6. Choose the appropriate model-specific driver using the Use drop-down bar. Alternatively, choose the Generic PostScript option to keep things simple for printers that don’t support advanced finishing options like stapling.

Using the CUPS web interface
1. Browse to <a href="http://localhost:631/admin" reseed-ignore class="urllink">http://localhost:631/admin</a>. Click the Add Printer button.
2. Choose LPD/LPR Host or Printer.
3. Populate the Connection field with lpd://hostname/queue. Here, the hostname is the Windows print server’s IP address or FQDN, and queue is the queue’s share name. Click Continue.
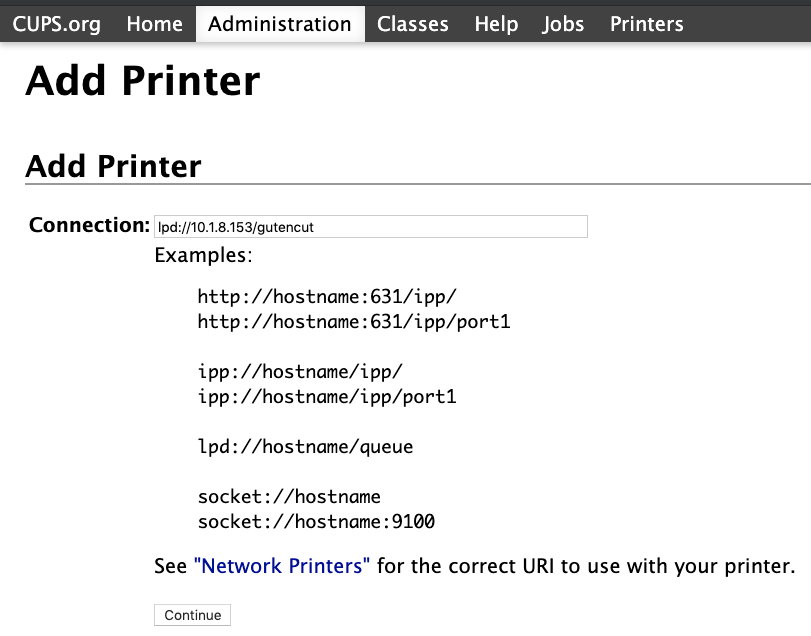
4. Next, populate the Name and Description field with the queue’s share name. The Location field is optional. Do not enable printer sharing.
5. Choose the appropriate driver for this queue by first selecting the Make then Model. click Add Printer.
6. Finally, set the queue’s default options.
Using the lpadmin command
1. Launch Terminal, or Hyper if you’re a hipster.
2. Pass a command that looks like the one below. This example only includes the most commonly used options.
$ lpadmin -p gutencut -E -v lpd://10.1.8.153/gutencut -P /Users/employee82/Desktop/Xerox.ppd
a. -p specifies the queue’s name
b. -E enables the queue
c. -v sets the connection URL. Here, use lpd:// to designate the protocol, the Windows print server’s IP address or FQDN, and the queue’s share name.
d. -P specifies the model-specific PPD file that belongs to the printer.
Note: The humble author of this KB assumes that if you’re using the lpadmin command to add the printer, you know what you’re doing. For example, the author assumes you know that you omit options to set defaults like page size or finishing options at your peril.
SMB
On the Windows Server
1. Make sure to enable print queue sharing. Just like the LPD requirement, ensure the share name only uses alphanumeric (letters and numbers) characters. No spaces.
Setting up the queue on the macOS workstation
MacOS offer several different methods to add/configure print queues via SMB, including via System Preferences, the CUPS interface, or using a terminal command. Shown below are the process for each of these methods. Go ahead and pick your favorite!
Method 1: Using the System Preferences pane (Option 1)
Note: Use option 1 for any cases, but especially so if setting up this print queue on a reference machine for configuration profiles with your MDM.
1. Go to System Preferences > Printers and Scanners > + (plus sign)
2. Right or Control-click on the space next to the Search bar and choose Customize Toolbar.

3. Drag the Advanced icon to the space above it then click Done.

4. Next, click the Toolbar’s new Advanced icon then set Type as Windows Printer via Spoolss.
5. Populate the URL field like so: smb://hostname/queue. The hostname is the Windows print server’s IP address or FQDN, and queue is the queue’s share name.
6. Populate the Name field with the queue’s share name.
7. Choose the appropriate model-specific driver with the Use drop-down bar. Alternatively, choose the Generic PostScript option to keep things simple for printers that don’t support advanced finishing options like stapling.
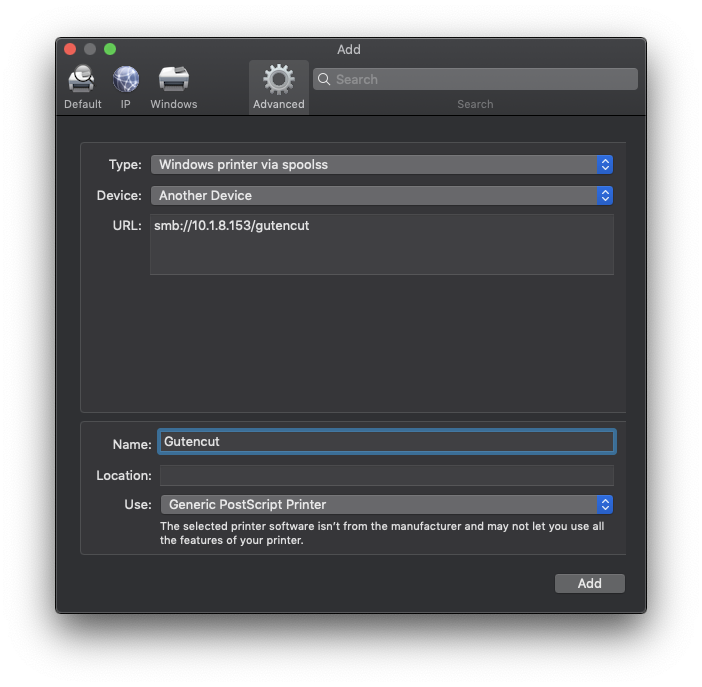
8. Finally, click Add and set the queue’s default options.
Authentication
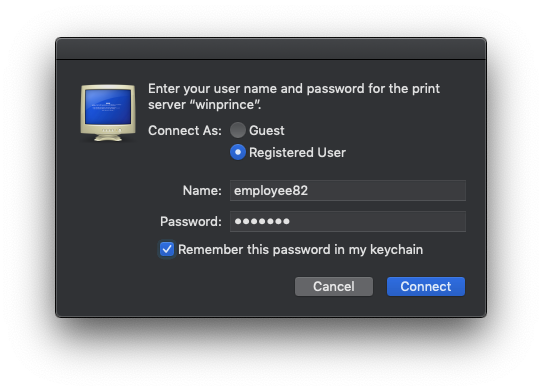
macOS will ask users to supply a username and password the first time they use this print queue. Don’t forget that the username and password used in this prompt are domain credentials known to PaperCut’s username list thanks to the server’s integration with your Active Directory domain. Check the box to “Remember this password in my keychain.”

Using the System Preferences pane (Option 2)
Note: One of the requisites of option 2 is that your macOS device network settings point to one of your domain’s DNS servers. You can add the DNS server IP manually, or use DHCP option 6 to automate the configuration. Also, do not use option 2 on a reference machine for MDM configuration profiles.
1. Go to System Preferences > Printers and Scanners > + (plus sign)
2. Choose Windows. Or, right/control-click, then Customize Toolbar to add the icon.
3. In the left-hand column, choose your AD Domain name.
4. In the middle column, choose your Windows print server name and enter your AD credentials.
Authentication: Don’t forget that the username and password used in this prompt are domain credentials known to the PaperCut user list thanks to the server’s integration with your Active Directory domain.
5. In the right-hand column, choose the queue name you want to add.
6. Choose the appropriate model-specific driver using the Use drop-down bar. Alternatively, choose the Generic PostScript option to keep things simple for printers that don’t support advanced finishing options like stapling.

7. Finally, click Add and set the queue’s default options.
Method 2: Using the CUPS web interface
1. Browse to <a href="http://localhost:631/admin" reseed-ignore class="urllink">http://localhost:631/admin</a>. Click the Add Printer button.
2. Choose Windows printer via spoolss.
3. Populate the Connection field with smb://hostname/queue. Here, the hostname is the Windows print server’s IP address or FQDN, and queue is the queue’s share name. Click Continue.

4. Next, populate the Name and Description field with the queue’s share name. The location field is optional. Do not enable printer sharing.
5. Choose the appropriate driver for this queue by first selecting the Make then Model. click Add Printer.
6. Finally, set the queue’s default options, click Add, and configure default options.
Method 3: Using the lpadmin command
1. Launch Terminal, or iTerm if you’re a hipster.
2. Pass a command that looks like the one below. This example only includes the most commonly used options.
$ lpadmin -p gutencut -E -v smb://10.1.8.153/gutencut -P /Users/employee82/Desktop/Xerox.ppd
a. -p specifies the queue’s name
b. -E enables the queue
c. -v sets the connection URL. Here, use smb:// to designate the protocol, the Windows print server’s IP address or FQDN, and the queue’s share name.
d. -P specifies the model-specific PPD file that belongs to the printer.
Note: Yes, the same cautionary advice applies here as it did for LPD. The humble author of this KB assumes that if you’re using the lpadmin command to add the printer, you know what you’re doing. For example, the author assumes you know that you omit options to set defaults like page size or finishing options at your peril.
Executive summary, or TL;DR
- We learned a few principals regarding SMB and LPD protocol connections.
- We learned user authentication is the criterium that most influences whether someone chooses to configure a queue with an SMB or LPD connection.
-
Use LPD:
- When users sign into their macOS workstations with usernames known to PaperCut
- When you have no obstacles preventing the installation of the PaperCut LPD service on the Windows Print server
-
Use SMB:
- When you can’t set up the Windows print server with the PaperCut LPD service
-OR-
- When users sign in to their macOS workstations with usernames unknown to PaperCut
-AND-
- When the PaperCut server gets its username list from the integration with your Active Directory domain
-
- We installed the PaperCut LPD service on the Windows print server.
- We set up an LPD queue using System Prefs, the CUPS web interface, and terminal using lpadmin.
- We set up an SMB queue using System Prefs, the CUPS web interface, and terminal using lpadmin.
- We learned any LPD option works just as well to set up a reference machine for MDM profiles.
- We learned Using the System Prefs pane: option 1 for SMB is the best choice when setting up a reference machine for MDM profiles.
Do you still have questions?
Let us know! Maybe you want to know about advanced config using the PaperCut user client with LPD or SMB. Anyway, talk nerdy to us. We love chatting about Apple, Windows, and what’s going on under the hood. Feel free to leave a comment below or visit our Support Portal for further assistance.
Categories: How-to Articles , Print Queues
Keywords: Apple mac OSX macOS SMB LPD Windows Printing It’s easier than it looks
Last updated March 15, 2024
Comments