This topic explains how to set up Chromebooks in a managed environment to receive printers from Print Deploy.
The client app for ChromeOS is the PaperCut Mobility Print Chrome Extension (available through the Chrome Web Store and distributable through the Google Chrome Enterprise admin console). Conveniently, it can also be configured to talk to the Print Deploy server.
Before you start
Check that your environment meets the following requirements:
- It has the following minimum software versions:
- Chrome version 114 or higher for the target users’ Chromebooks.
- You’re a Google Chrome Enterprise admin for your organization.
- You’re also a PaperCut NG/MF administrator (or have relevant permissions).
- make sure that the PaperCut NG/MF Application Server is accessible via TCP 9191, 9192, 9195, 9173, 9174 from the targeted client machines—preferably by an FQDN (Fully Qualified Domain Name) rather than an IP address.
Steps
To deploy the Print Deploy client using GPO:
- Step 1: Install the Mobility Print Extension on your users’ Chromebooks
- Step 2: Set the policy for the Mobility Print Extension
- Step 3: (Optional but recommended) Test your changes
Step 1: Install the Mobility Print Extension on your users’ Chromebooks
Add the Mobility Print Chrome Extension from the Chrome Web Store on to the users’ computers in one of the following ways. In Google’s Chrome Enterprise Help, go to the:
- View and configure apps and extensions page and follow the steps in the Add Apps section.
- Automatically install apps and extensions and follow the steps to force the app to automatically install on your users’ computers.
Step 2: Set the policy for the Mobility Print Extension
The policy lets the Mobility Print Extension know from which server to contact to get the print queue details.
-
In PaperCut NG/MF, click Enable Printing. The Print Deploy page is displayed.
-
At the bottom of the page, click ChromeOS . A
.txtfile withJSONcontent is downloaded that contains the hostname or IP value that you’ll use to set the app’s policy. -
Go to the Google Chrome Enterprise admin console .
-
Navigate to Device management > Chrome > Apps & extensions and click on your organizational unit to see your apps.
-
Select Mobility Print. This opens a panel where you can set the value of the app’s policy.
-
Copy the contents of the
.txtfile you downloaded in step 2 and paste them into the policy field’s textbox. The text should look like: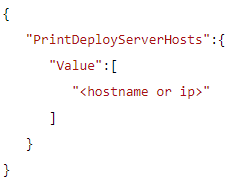
Alternatively you can upload the
.txtfile by clicking theupload from fileicon. -
Double-check that the <hostname or ip></hostname> is your PaperCut NG/MF application server’s FQDN or IP. For example,
"print.company.tld"or"192.168.1.16". Use a FQDN if possible, as this will fail faster when a user is not on the network, avoiding delays for their home printing.Make sure you do not affix your FQDN or IP with a scheme or port number and remember to wrap it in double quotes.
-
Click Save. The Mobility Print app policy is now set.

Step 3: (Optional but recommended) Test your changes
Of course, it’s always important to first test any changes on a test computer before rolling them out to all of your users’ computers.
This test checks that the target computer can see the expected Mobility Print queues to confirm your policy has been picked up by the Mobility Print app:
-
Log in to the test computer; then in the browser’s address bar, type
chrome://policy. The Policies page is displayed. -
Find the section for Mobility Print and check whether the <hostname or ip> value you set in step 2 has been set correctly for the Policy Name PrintDeployServerHosts.
 </hostname>
 -
If it’s set correctly, go to the next step. Otherwise, work through the following checks to find the problem:
- Check that the user logged in on the test computer belongs to the organization unit for which you’ve set the policy in Step 2.
- Type
chrome://extensionsin the browser’s address bar and search for Mobility Print to check that the app is actually installed on the computer.. - Make sure the Mobility Print app is running on version 1.0.237 or higher.
- Check that the value of the policy field in the organization unit is a valid JSON object and that your FQDN or IP is wrapped in double quotes.
- Log out of the user’s session and log in again. Policy updates might take several minutes before they’re applied.
-
Open a sample document or page from the browser. Right-click on the page and click Print.
-
Because this is your first time printing with the Mobility Print app configured for Print Deploy, you’ll automatically see a PaperCut login popup.
-
Type the user’s credentials; then click Log in. After the Mobility Print app has verified your credentials, the login popup closes.
If a connection failure error occurs, check the following:
-
If you’ve set up an SSL certificate for Print Deploy, the FQDN or IP you’ve specified in Step 2 should be reachable from this test computer on port 9174 via HTTPS without any warnings from the browser.
To check it is reachable, in the address bar type
https://<hostname or ip>:9174; then press Enter. You should at least get a 404 response or an empty page with a coffee cup icon. -
If you encounter an SSL error, for example, the browser says ’the connection is not private’, then ensure you’ve set up the Print Deploy server with a CA-signed certificate .
-
If you’re using a self-signed certificate, check that you’ve added the root certificate as a certificate authority in the Chrome Enterprise admin console.
- If you encounter issues connecting, check that you at least get a 404 response when you enter
http://<hostname or ip>:9173. Otherwise, check your firewall rules and ensure that outbound connections to port 9173 have been set.
-
-
Click the printers drop-down list and select See More. Another dialog opens that lists all the discovered printers in your network.
-
Check that the expected Mobility Print queues are visible in the list. These printers are marked with the PaperCut icon:

If you see the queues, great—it’s all working just fine! You’re ready to roll them out enterprise wide. Otherwise, check the following:
- Your user belongs to the zone you’ve configured in the Print Deploy page. Double-check that the user’s IP and group membership applies for the filter you’ve set for the zone.
- You’ve connected Mobility Print queues to the zone and that the queues are marked with the ChromeOS icon.
- If you are sure that there are already Mobility Print queues in this zone but they do not have the ChromeOS icon, check that you’re running the Print Deploy server on version 1.1 or higher. Using the latest cloner tool downloaded from this version of Print Deploy, clone your Mobility Print queues from the reference computer again.
Comments