
Contents
Disabling Advanced Printing Features
THE PAGE APPLIES TO:
Last updated April 13, 2026
Contents
What does the “Enable Advanced Print Features” checkbox do?
The setting “Enable Advanced Printing Features” is a mysterious and often misunderstood setting in Windows printing that harkens back to the ancient days of Windows NT. When this setting is enabled then jobs are spooled in the EMF format and rendered on the print server. The option used to be called Always spool in RAW in Windows versions prior to Windows 2000 but was later renamed to “Advanced Printing Features”.
Why does PaperCut recommend disabling this setting?
When this setting is disabled, documents will spool in RAW format, which could be Postscript, PCL, or the printer’s native language. This allows PaperCut to easily read the files, which in turn enables a number of PaperCut features such as accurate page count and color detection, grayscale conversion, and watermarking.
In PaperCut MF 18.2, we introduced the ability for users to Change Print Job Settings at the device. As one example, this allows users of supported copier devices to change their color job to a grayscale one at the point of release. Changes of job attributes via this feature will also be prevented if Advanced Printing Features are left turned on. If you intend to enable the Change Print Job Settings feature, Advanced Printing Features should be disabled on all relevant print queues.
In addition to interfering with the way that PaperCut analyzes and modifies print jobs, this setting can also cause excessive load on the print server. So, we recommend turning this off if possible.
How do I turn this setting off?
This setting can be disabled using PowerShell (continue reading below) or it can be changed manually on a Windows print queue with the following steps:
- Open Print Management by pressing Windows key + R, then type printmanagement.msc and hit the enter key.
- Next, right-click on the printer you want to manage and choose Properties…
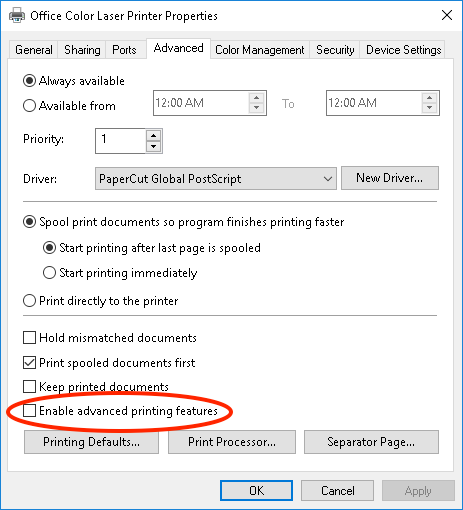
- Select the Advanced Tab.
- Uncheck the box next to Enable advanced printing features.
- Print a test page to confirm everything is working as expected.
One other added benefit of this change is that Client Side Rendering will be used which transfers the processing load from the server to the printing clients. It also reduces the probability of a spooler crash on the server. Because the server does not participate in rendering, a “buggy driver” will not crash at the server level. Instead any problems are only observed on a single workstation.
Client-side vs. server-side rendering is transparent to the end-user. This setting can be changed without the need for a server restart for it to be affective.
Special Note For Microsoft Clusters: To edit/change this setting on a cluster server, open Windows Explorer and navigate to \\<cluster virtual server name>\Printers and Faxes then right-click on the printer and select Properties....
Please note: This option is grayed out when using Type 4 drivers or XPS print driver.
Is there a way to do this automatically for all my printers?
Yes! There’s no need to make this change manually on all of your print queues. Using PowerShell it’s possible to change this setting for all your printers automatically. If running PowerShell commands on your production print server makes you a bit nervous, then follow our steps here to make a backup of your print server.
Open an elevated PowerShell window on your print server and run the following commands:
$printers = Get-Printer -Name *
foreach ($p in $printers)
{
cscript c:\Windows\System32\Printing_Admin_Scripts\en-US\prncnfg.vbs -t -p $p.name +rawonly
}
main_category: categories: Troubleshooting Articles, Print Queues
Category: Reference Articles
Subcategory: Print Queues
Keywords: disable, page count problem, enabled advanced, enable, EMF, no job status, stuck job, change print job settings
Comments